Monday, October 28, 2013

Matting and Framing

Matting and now framing have pretty much defined the past few days around here. 15 prints in all.  Matting was really frustrating at the start as I worked with some new, harder mat board. I was ready to go shopping for new mat cutting equipment. Then, I modified the way I was holding the cutting tool and it made all the difference in the world. Funny. After years of holding the tool in a certain way I discover that moving one of my fingers from here to just slightly over there, and the consistency of my cuts improves.


Today, I started with a stack of stems, 60 in all, that I ripped, planed, and cut to length yesterday. Today, working at the table saw with a dado blade, channels were dug out of each stem. By the end of the day, all 15 frames were assembled. Tomorrow they’ll be sanded and, if all goes well, at least some will have a first layer of color added to the surface.

Wednesday, October 23, 2013

Show time!

The 19th Annual Orange County Open Studio Tour always falls on the first two weekends of November. This year, the dates are November 2-3 and 9-10. More than 70 local artists are participating. My studio is #25. Brochures are available in likely places around town or you can download one here.

Each year I get an interesting and diverse mix of visitors from collectors, to students of photography, to folks just out for a pleasant weekend activity. This year I plan to exhibit 30 to 40 prints. And with less than two weeks until show time, the making of lists and scratching them off has already begun!

Currently, I'm making an inventory of available prints. Some are hanging in various locations around town. Some are standing stacked in a corner at home. Others need to be matted or framed. I’ve also looked through my pile of finished prints from the past few months of work. Ranking them, I suppose. I'm down to the top 15 and still cutting!

The plan is to select no more than a dozen new prints to finish out. In addition, 8 or 10 prints were framed out for a couple of shows last summer that haven't shown locally. Combined, that should satisfy my need to show new work whenever exhibiting.

That's because not showing new work feels a little too much like being unemployed. Simply put, we are what we create in this life. Most employed people in our society get a paycheck every week or two that provides regular gratification (hopefully) and validation for their labor. Sadly, making gum bichromate photographs doesn't come with that built in work perk. More likely, it comes in the form of holding a satisfyingly-finished-but-still-dripping-wet print in my hands. From there. matting, and framing, and exhibiting these newborn prints completes the creation cycle. 


Thursday, October 17, 2013

Positive Negative Notes

It turns out my hunch was right. In “The Rabbit Hole,” a couple of posts back, I went on about muddy prints. But near the end of the post, I mentioned trying another round of prints. At the time, I thought the problem might not be the negative or the script but the way I was using it. Maybe these new negatives required a new approach to printing.

What I’ve experimented with this time around is sticking with the same exposure time, coat after coat after coat. In this manner, I slowly build the print from shadow to highlight, one zone at a time. The ideal time varies from one negative to the next but the range seems to be 1½ - 3 minutes. I love that. Exposing in this manner, highlights start to emerge around coat 6. Curiously, this method takes me back to my early days of gum printing when I worked exclusively with analog/film negatives. What goes around comes around.

But that's radically different from the way I’ve been printing the past few years. My previous digital negatives called for an extreme range of exposure times and formula variations. The first few coats applied might take 3 minutes each until shadow detail was established. But as the print evolved, subsequent layers required more and more time to capture highlights. 15 to 20 minute exposures became the norm. Switching to the QTR print driver with no knowledge of how to use it amplified the problem. Highlight layers were taking up to 45 minutes. In the winter sun!

Unfortunately, the finished product was really appealing. More contrast and more color dynamism than ever before. I wanted the look without the long exposures.

That’s when I took the digital negative workshop. I was hoping to come away with a gum curve I could use with the QTR driver that would modify the way my Epson 7600 printer did its job. Several of us brought Sandy King up to North Carolina last winter to teach a workshop. Sandy taught for years at Clemson University. He made the switch from analog to digital negatives years ago and had been working with QTR for a good long while. Sandy is also an amazing carbon printer.

The carbon process is first cousin to gum so I figured he’d have a basic understanding of what a good gum negative might look like. And in fact, the prototype negative I started working with after the workshop was his carbon curve with minor changes in the script. Some 9 months and several tweaks later, I feel like I’m almost out of the digital morass I put myself in during the winter of my discontent.

Trying to come up with the perfect gum negative is as elusive and chameleon a quest as there is in all photography. That’s because there’s no established end goal for gum printers. Everyone knows what a great black and white print looks like when they see one. The same goes for platinum, cyanotype, photogravure. Almost all the hand-made processes have a well-defined look of their own. One of the things I love about gum though is how flexible the process is. And how varied that final look can be.


As I continue to work with negatives using the same gum curve, I should pick up more tricks for coaxing them along to a satisfactory end.

Wednesday, October 2, 2013

Cloud Talk

When I started writing the previous post, “The Rabbit Hole?” my intention was to write about wanting to spend more time with a camera in my hand. That is to say, the front end of photography. Printing, the back end, takes up so much time and effort (as well as tons of enjoyment) that I don’t spend as much quality time photographing the world around me.

I started writing about it the other day because it’s been bothering me lately. I wanted to try fleshing it out on the page but before I knew it, I was in the middle of a very different, more familiar kind of post about printing digital negatives. I couldn’t help but smile at the irony.

So, let me try again to write about taking pictures with a camera.
I think a lot of photographers work in series. You know, they photograph smashed beverage cans, or graffiti, or barns, or street people. Seems like a good motivational tool but whenever I’ve tried it, it has come off as contrived and a bit too restrictive.

But feeling the pinch from not shooting, I’ve been thinking about a project that has intrigued me for years. And has gone no further than intrigue. The project would be to illuminate the Chinese book of wisdom, the I Ching.

I first began to study the work when I was in college in the 1970s. At the time, it provided me with practical as well as spiritual insights that I soaked up like a sponge. Those fundamental principles continue to inform my life today.
The book is divided into 64 hexagrams. Each represents a facet of Taoist philosophy. Each is a meditation unto itself. Borrowing the language of the English poet William Blake, my project would be to “illuminate” each of the hexagrams.

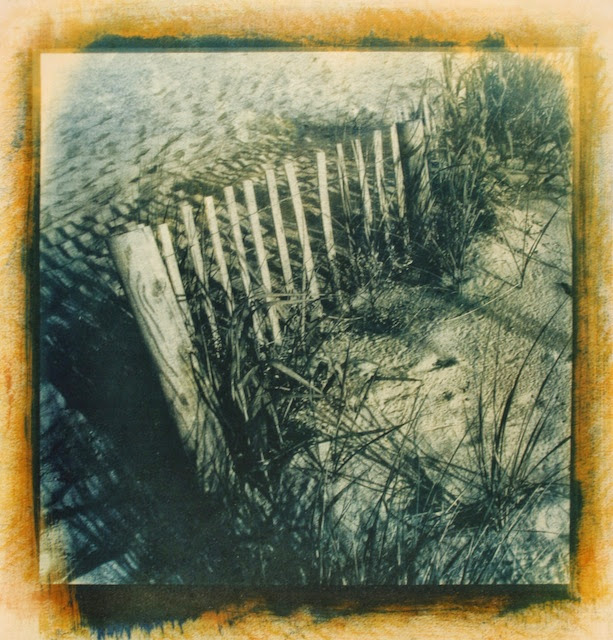
Waiting. A humble fence gathers life to itself.
This was the scene that got me onto the idea for the project. The hexagram that came to mind was number 5, “Waiting.” The commentary is about nurturing strength and awaiting the proper time. Strength through patience. There’s more to it than that, of course, but you can read it for yourself**. I thought of that hexagram when I was walking along our beautiful shoreline in North Carolina.

**I use two different English translations. The first is by the famed sinologist of the early 20th century, Richard Wilhelm. The other is by a contemporary translator of Taoist texts, Thomas Cleary.

Tuesday, October 1, 2013

The Rabbit Hole


I’ve been working with the same set of 8 or so negatives for the past few weeks and it’s getting a little boring. Made a few prints that are pleasing enough. But not pleasing enough to feel comfortable introducing new negatives using the same printer script as these 8. That’s because over the past few weeks, alongside the satisfactory prints, there’ve been too many muddy ones.

Muddy prints are not uncommon with gum printing. A quick Google search proves the point. It’s easy to make them muddy, but gum prints don’t have to be that way. The main culprit is often poorly sized paper. But I’m printing with the paper I recently sized and that doesn’t seem to be a problem. This new paper is really sweet. I’ll talk about why another time.

Gum printing has so many variables that can effect a finished print. In general, successful pre-script negatives behaved beautifully for the first few layers, but often enough, prints got pretty muddy throughout the middle coats of an 8-12 layered print. That’s how these new negatives have worked as well.

Over the years I’ve learned some tricks to get through the Big Muddy Middle and onto some exciting finished prints. But these new negatives are not like any I’ve ever worked with before. And they’re not cooperating in the usual ways. So I’ve started a second round of prints with the same negatives. I think I figured out a few things in round one that I want to test out in round 2.

So I’m still wading a little gingerly into a big time printing session. I’m up for one. I prefer working with a lot more than 8 or 10 negatives like I have recently. 25 or more negatives at the same time is a lot more stimulating on a day to day basis. But for now, I’ll continue to test the new negatives I’ve been working with the past couple of months before I add any new images to the mix.